As promised, today I'm going to take you through one of my processes.
Recycled Rings are part of a somewhat ongoing collection featuring the things that I come across in my bag of donated jewellery. It's fun project. I take interesting looking buttons or more than likely - clip on earrings from the bag. Then I take it apart until I'm left with just the cabochon. Next it's gently cleaned with bicarb paste and an old toothbrush and then enjoys a bath in my ultrasonic cleaner. Once it's been dried and polished it's either carefully glued onto a ring shank or secured in a seed beaded setting. Once the glue has dried or the thread has been snipped - it's finally ready to be worn as a beautiful ring and sold on Etsy, or snuck by my Mom into her jewellery box. You'd be amazed at how many things disappear in there! ;)
The next time I make one, I'll photograph the process and add them to this post. Meanwhile click "read more" to see some of my finished Recycled Rings...

Welcome to the X99 Jewellery Blog!
Here you can find exclusive content like insight into my design process, things I'm currently working on and the occasional giveaway! I'll also show you things I've made for my family, friends and for myself.
Monday, 9 November 2015
Quick (Long) Note
Just a quick note before I go to bed, to say that the Etsy shop will re-open later today. I've worked hard all week to make sure that everything looks good and is as it should be. There's only a few items in there at the moment, things that I think will look good during the holiday season. I do have a few more things to add, which I'll do as they come.
Updates include:
This week when I'm not beading I'll be updating the blog pages to reflect the shop, as most items are no longer available and I'm not sure when they will be. Please note that I'm only removing the links to the shop, so if there is an item that you're interested in that isn't available on Etsy - don't hesitate to contact me either by email (kymberligee@gmail.com) or through the shop as I'd be happy to discuss selling them.
Now I've got a setup that I'm happy with, I'm going to try keeping the blog updated with insights into my design processes and also show you work-in-progress that you won't be able to see anywhere else. Probably including my many mistakes! ;)
I also have some plans for the future which I'd like to share with you. I would like the do the occasional giveaway, like I did back when I launched the Sweet Tooth Collection. Would this be something you guys would be interested in? Everyone likes freebies, right? I'm also considering giving a discount on their next purchase to buyers who send me a photo of themselves wearing what they've bought - as I think it would be great to show how my jewellery looks in a real life setting.
I can honestly say that this is the first time that I've been thoroughly focused on getting the shop up and running, my first go at the holiday season (so be kind!) and probably the first time I've actually been happy with the shop as a whole - in terms of what I'm selling, the way they look and how the shop itself looks. I just hope I'm not spreading myself too thin again by trying to do too much.
Anyhow, I'll see you later today for the Grand Re-opening as it were.
x Kym x
=:x
Updates include:
- I now have options on packaging. I have both my usual organza bags in my "brand" colours (black, purple and gold) and I've just bought some beautiful gift boxes available in either black or purple. So depending on its fragility, your item will come in whichever packaging is stated on the item page. Believe me though, both are a lovely option for gifting!
- I've updated the pages about me and about the shop and what I do to reflect my current interests.
- All photos are as consistent as I can make them. Necklaces will be modelled on my mannequin, while rings and bracelets will be modelled by either me or my mom, depending who's handy at the time - usually me because I'm impatient - LOL! Close ups will be taken on granite.
- Perhaps most important of all - I've decided to give back to the organisation that helped me find this hobby. So from now on 10% of every sale I make, will be donated to the mental health charity MIND.
This week when I'm not beading I'll be updating the blog pages to reflect the shop, as most items are no longer available and I'm not sure when they will be. Please note that I'm only removing the links to the shop, so if there is an item that you're interested in that isn't available on Etsy - don't hesitate to contact me either by email (kymberligee@gmail.com) or through the shop as I'd be happy to discuss selling them.
Now I've got a setup that I'm happy with, I'm going to try keeping the blog updated with insights into my design processes and also show you work-in-progress that you won't be able to see anywhere else. Probably including my many mistakes! ;)
I also have some plans for the future which I'd like to share with you. I would like the do the occasional giveaway, like I did back when I launched the Sweet Tooth Collection. Would this be something you guys would be interested in? Everyone likes freebies, right? I'm also considering giving a discount on their next purchase to buyers who send me a photo of themselves wearing what they've bought - as I think it would be great to show how my jewellery looks in a real life setting.
I can honestly say that this is the first time that I've been thoroughly focused on getting the shop up and running, my first go at the holiday season (so be kind!) and probably the first time I've actually been happy with the shop as a whole - in terms of what I'm selling, the way they look and how the shop itself looks. I just hope I'm not spreading myself too thin again by trying to do too much.
Anyhow, I'll see you later today for the Grand Re-opening as it were.
x Kym x
=:x
Saturday, 31 October 2015
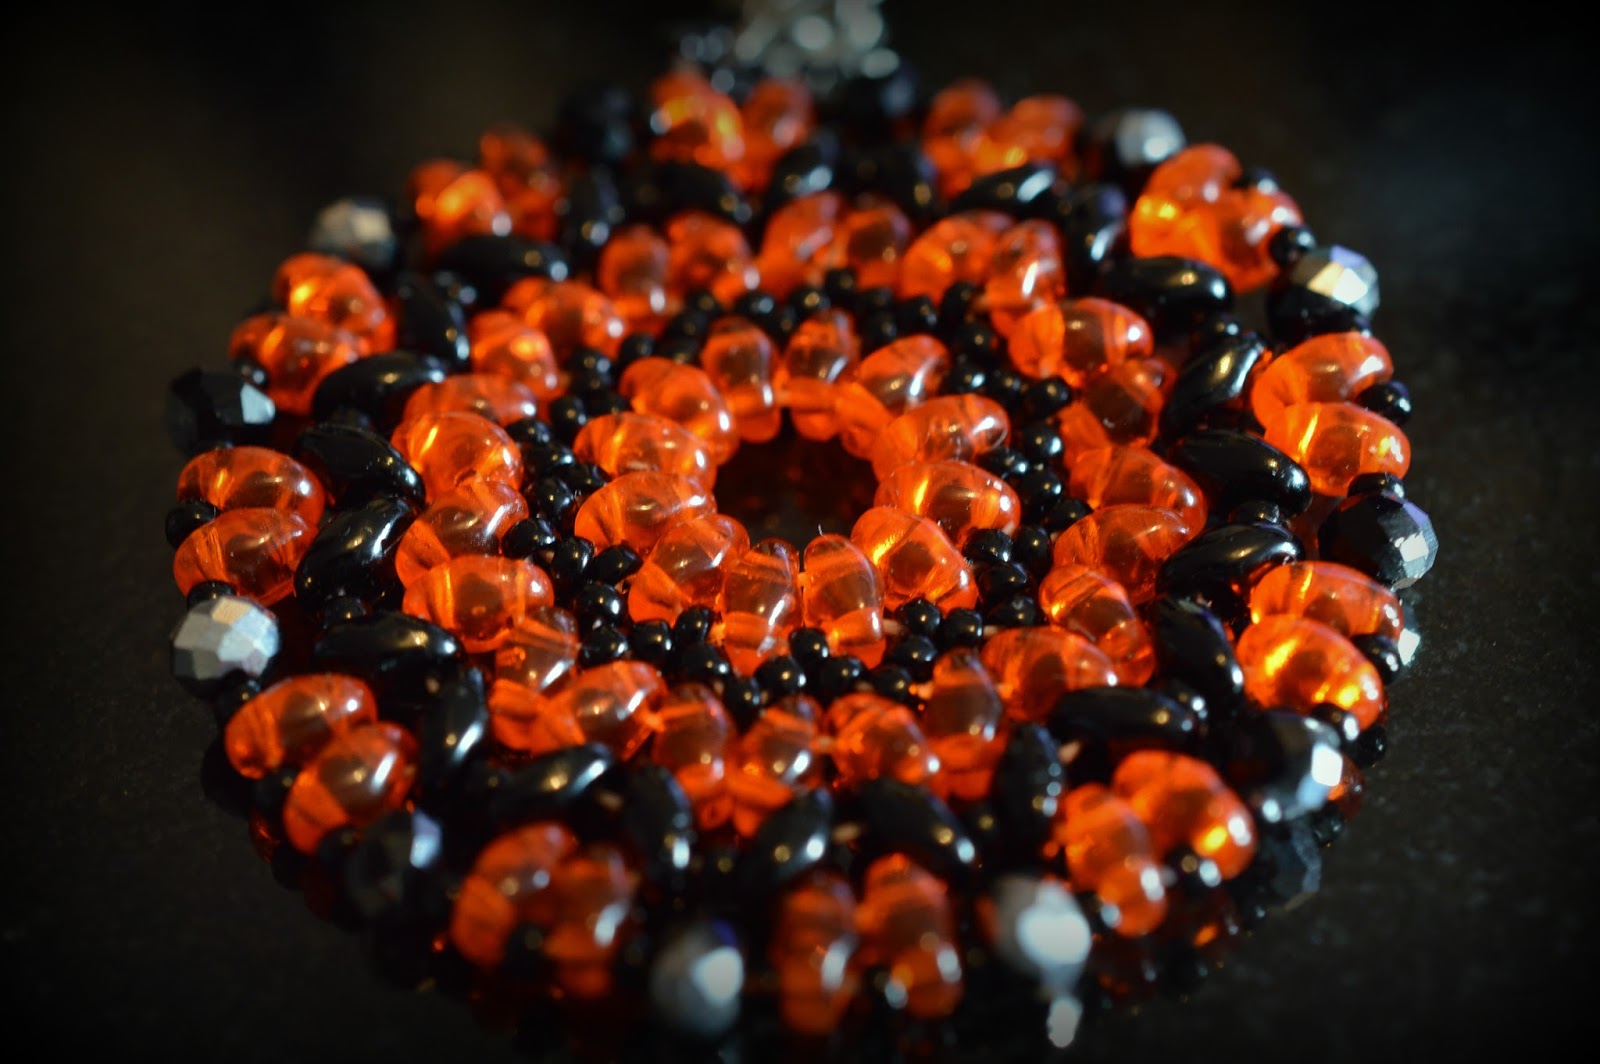
Pumpkin Mandala Necklace (Halloween)
This is the other version of the Mandala tutorial I made from i-Beads by purplefiona at FionaFiona. This is the orange and black colourway using my free gift from i-Beads - which were the transparent orange superduos.
 I used those along with some opaque black superduos for contrast as well as the black seed beads.
 Instead of using crystal bicones that decorate the outside, this time I used half black, half silver crystal rondelles, which add a little extra sparkle. I haven't made earrings to go with these. I may do eventually, I just haven't had time lately. Side note: I was originally going to call this Orange is the New Black, but I didn't think I'd get away with it!

BTW - I hope you're liking the new setup. I got my mannequin reupholstered in a lovely aubergine velvet from Corset Laced Mannequins over on Etsy. It's so much easier to show off my necklaces and see how they hang than the display models I was using. So if you're looking for a mannequin or you'd like to spruce up one you already have, I highly recommend you check out her shop!
For the close ups I've been using one of our granite placemats. So if you see any weird reflections, it's just the various posters I have hanging in my room - lol! I would use a less reflective surface, but I like the effect it gives. I do try to minimise the reflections on the post edits.
Well, that's the end of my Halloween jewellery. This weekend I'll be getting the shop ready by photographing, uploading and editing all the jewellery I'll be selling up to Christmas. I hope you'll stop by, as I'm hoping to donate a portion of my profits to the mental health charity that got me started on this craze in the first place.
Here's wishing you a safe and happy Halloween!
x Kym x
=;x
Friday, 30 October 2015
Witches Brew Mandala Set (Halloween)
So I've already caught my mom trying to sneak this into her own jewellery box, even though I made it for myself from this awesome tutorial from i-Beads.
 I changed the colours to my own personal taste - pastel bordeaux and black matte superduos, mixed with purple iris seed beads and chinese crystals.
 Obviously as this is someone elses design (purplefiona at FionaFiona) I can't sell it - this was made for me personally - and my mom when she decides to steal it! I also made another one, which I'll post about shortly. In the meantime here are some extra photos.


 =:x
=:x


Pumpkin Netted Pearls Bracelet (Halloween)
My mom says this bracelet reminds her of the clementines you get at Christmas in the netted bags, and I'm inclined to agree with her. Maybe I ought to change the holiday theme for this one?
 I used 12mm neon orange Swarovski pearls and placed them inside a length of black knitted wire.
 I then twisted the knitted wire between each pearl to secure it before tying the ends to a silver toggle clasp.
=:x


=:x
Pumpkin Spiked Latte Necklace
I just knocked this up quickly last night, inspired by this Jenna Marbles video:
 This is the Pumkin SPIKED Latte Necklace!
 It features alternating Pumpkin and Gunmetal coloured acrylic spike pendants hanging from gradually reduced lengths of gold-plated trace chain. These hang from a chunkier gold-plated round link chain.
 It's finished with a gold-plated toggle clasp.
Thanks to Jenna & MOQ (Julien) for inspiring this necklace!
=:x


Thanks to Jenna & MOQ (Julien) for inspiring this necklace!
=:x
Thursday, 29 October 2015
Anansi Set (Halloween)
Sorry it took me longer than I intended to get these photos taken. First I'd like to share the very first idea I had for my Halloween jewellery. Don't forget to click on the photos for a better view! ;)
 I had these triple stud bridge beads from Beads Direct which I love using. My idea was to mix them with some Swarovski neon pearls that I'd bought on sale. As I discovered when making the focal, I had to tinker with the sizes of the pearls on the top and bottom to get the gentle curve I wanted. I had also failed to take into account how I was going to keep the bottom beads from falling off. As you can see in the finished necklace below, adding a jump ring and a couple of spike pendants not only solved my problem, but also adds a little something extra to the unusual design.
 I attatched a chunky silver curb chain to either side of the focal and also added these cute little spiderweb charms from Jilly Beads. Taking a step back, the finished design kind of looks like a grinning face with fangs?
For some reason I couldn't leave it there, and quickly created these earring to go with the necklace.
 I'll leave you with some closeups, but please let me know what you think - would you like them to be available to buy?
=:x


For some reason I couldn't leave it there, and quickly created these earring to go with the necklace.

=:x


Tuesday, 20 October 2015
Coming Soon...
Hey everybody!
I've been away for a while again, I know, but this is because I've been designing and creating new things. I've also been re-imaging and trying to get a feel for which direction I want to go in. I think I've finally got the setup I want to take photos and show off my creations. I'm going to start small, with the recycled rings, which I'll be launching soon on Etsy - once I've got all the photos done. Then I'll show you my new creations, which I'll be uploading periodically, starting with the fun little projects I've been making for Halloween. I don't usually like making holiday-themed jewellery, so I'm not sure if I will make them available to buy - I guess I'll just see what you think!
As for my old creations, I'm not sure what will happen to them. I may make a few pieces from the metallics collection available again, but I think anything from before then may be disassembled and remade into something new. Making whole collections has been a terrible strain, and I've decided it's not really what I want to do. So I'll be putting my energy into making one special piece instead. That said, the "I Heart..." collection will still be going ahead, but won't be available until next year - what was I saying about not liking holiday-themed jewellery? *cough* LIAR! *cough*
Anyway, I'll hopefully see you all soon with some Halloween themed jewellery and news on when you can buy the recycled rings from Etsy!
Love Kym,
=:x
Tuesday, 16 June 2015
Hades Necklace
Today is a necklace that I've had pictured in mind for a while, but I wasn't sure exactly how I was going to create it.
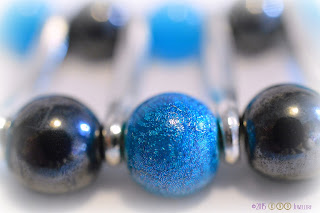
 It's a collar - almost tribal-style necklace using silver-plated connectors, 6mm & 8mm turquoise/blue glass beads and 6mm & 8mm magnetic hematite.
 It's brought together with gunmetal-plated cable chain and a gunmetal-plated lobster clasp.
 Looking at the finished article, I'm thinking I may have enough materials to do away with the chain and make it into a full collar, or at least make the chain shorter. It might be very heavy though.
 The 8mm blue glass beads that I used were part of a mystery pack of glass bead strands that I had from the U.S. They're absolutely beautiful up close, with a kind of texturing underlay, almost like foil.
 I'll have a go at the full collar and I'll repost it if it works out.
=:x


=:x
Monday, 15 June 2015
Sarah Millsop's Crystal Weave Bracelets
This weekend I've been making these bracelets from Beads Direct's Take A Make Break.
 I pretty much had all the components to make the "Blueberry" version - apart from the catseye, but seeing as working with beads with chatoyance gives me a headache - it worked in my favour. It took me a while to get the hang of it, but once I did, I kind of got excited about seeing what else I could create. So I did a "Salsa" and a "Punk Princess" version too.
For the Salsa, I used these multicoloured drawbench beads I bought from one of my trips to Beading Amazing. Instead of the Chinese crystal rondelles, I used 4mm Chinese crystal bicones instead - Amethyst with an AB coating. For the seed bead weave, I used matte rainbow siam Tohos, to match the colours in the drawbench beads.
For the Punk Princess version, I used pink drawbench beads, silver Chinese crystal rondelles and the matte jet Tohos I used for the Blueberry bracelet. Looking at it now, I think maybe silver would have looked better?
I'll definitely be making more of these, I think I want to make a necklace version next time using gemstones. So look out for that maybe later in the week!
=:x
If you would like to make these yourself the video can be found here: TAMB - Crystal Weave Bracelet
And you can still get the kits from Beads Direct for £14.99 each. Choose from the Blueberry Ripple or the Raspberry Ripple.

 |
| Which version do you like best? |
For the Punk Princess version, I used pink drawbench beads, silver Chinese crystal rondelles and the matte jet Tohos I used for the Blueberry bracelet. Looking at it now, I think maybe silver would have looked better?
 |
=:x
If you would like to make these yourself the video can be found here: TAMB - Crystal Weave Bracelet
And you can still get the kits from Beads Direct for £14.99 each. Choose from the Blueberry Ripple or the Raspberry Ripple.
Thursday, 11 June 2015
Dorothy Ring
I've been dipping into my donation bag again and I've been making some really cool rings with the some of the things I've found in there. This ring used to be a clip-on earring, I believe.
 By using the earring like a cabochon, I beaded around it using tubular peyote stitch with ceylon yellow and brown iris coloured seed beads.
 The band that I stitched for the ring reminded me of the yellow-brick road - hence the name Dorothy.
 I've done quite a few of these as they are fun to do and it's nice watching old jewellery transform into something new.
 =:x
=:x


Wednesday, 10 June 2015
Camille Bracelet
I thought today I would share with you a bracelet I made for myself recently from a tutorial from Spoilt Rotten Beads. As I said last week, I've been looking into how to use two-hole beads in my beadwork. I came across these new beads from France called Khéops Par Puca and instantly I was filled with a desire to own as many as I could afford and find out all the many ways I could use them. As they are triangular, I can imagine they'd lend themselves to all sorts of different patterns and shapes. I thought I'd better get comfortable with using them before I started hashing up my own designs.
 The Kheops I used for this were the California Graphite - half gold, half gunmetal. I also used Czech fire-polished crystals in iris brown, and the Toho seed beads outlining in the same shade.
 To finish off I used a gunmetal clasp.
 I also made my mom one, using silver Kheops and hematite beads and coloured seed beads.
=:x


=:x
Tuesday, 9 June 2015
Monochrome Floral Ring
I was about to make another bracelet to go with the ones from yesterday and found myself making this ring instead.
 It's the same principle as the bracelets and they go really well together.
 This time I used a glass flower bead instead of acrylic or clay, so it lays flat against the finger. I cheated a little as it's not completely white - more of an opal effect - but it came out of a monochrome bead mix, so it still counts!
 It's elasticated like the bracelets, so it should fit whichever finger you chose to wear it on.
=:x


=:x
Monday, 8 June 2015
Monochrome Floral Bracelets
I seem to have developed an addiction to glass pearls and lucite flower beads lately, so I thought why not combine them?
 I'm not usually a fan of polymer clay. I mean, I appreciate the effort that must go into making things with it, but the end results never seem to go with my style of jewellery making. That was until I saw these roses over at Jilly Beads.

Friday, 5 June 2015
Arabian Nights Bracelet
Our last bracelet of the week. I've had these packs of really pretty beads mixes from Jilly Beads just sitting in my collection for ages. I keep saying to myself - one of these days I'll make a quick bracelet or a pretty necklace - and nothing happened. Well today is one of those days.
 I tried picking up random beads, but the OCD part of my brain didn't
like that, so it's in a repeating pattern that still manages to look
random. I hung a beaded dangle from each end to give it an extra feature.
I tried picking up random beads, but the OCD part of my brain didn't
like that, so it's in a repeating pattern that still manages to look
random. I hung a beaded dangle from each end to give it an extra feature.
 The beads are in lovely jewel tones - Jade greens, emerald greens, ruby reds, sapphire blues and amethyst purples - with the occasional flash of copper
and bronze, so I can see it being a really good look for the Autumn.
The beads are in lovely jewel tones - Jade greens, emerald greens, ruby reds, sapphire blues and amethyst purples - with the occasional flash of copper
and bronze, so I can see it being a really good look for the Autumn.
 It's on memory wire, so you can just wrap it around your wrist.
 =:x
=:x


Thursday, 4 June 2015
Wrong Side of the Tracks Bracelets
Today I have not one, but two bracelets to share with you. I'd never used two-hole beads before and I didn't really know what to do with them. Then I came across this tutorial from Inspirational Beading using Chevron Chain with Tilas.
 I'd bought some beautiful marbled rose tilas which I paired with Ceylon Ivory seed beads. When I showed it to my mom, she told me it looked very bridal style. I was actually trying to create an antique lace effect, but whatever.
 I beaded the toggle clasp and loop, so it's another metal-free bracelet.
 I made another, but this time I used all black beads. Instead of using two size 6/0 beads on the edges, I used 3 size 8/0s.
 I also changed from using beading thread to using elastic instead, so this one is clasp-less too.
 I had fun(!) trying to figure out how to connect both ends together without leaving a seam, but I finally managed it! I'm thinking of making another one of these and attaching it to a ring.
=:x


=:x
Wednesday, 3 June 2015
Candy Cubes Bracelet
Today's bracelet is one I've been meaning to post for a while, but every time I tried to take a photo the lighting was all messed up. Anyway, I think I've finally got some that I'm actually happy with = Perfectionist.
 The design is based on this tutorial from Ruby's Beadwork. I used brightly coloured acrylic cubes with an AB coating. They kind of remind me of the Jap sweets you get in Dolly Mixtures - in fact I think I used them in the Dolly Mixture set. I know, I know...more sweet inspired jewellery - I swear I'm not trying to recreate the Sweet Tooth Collection!
 It's a basic Daisy stitch, with seed beads lining the cubes. The ones I used are a mix I got from Jilly Beads
called Sugar Sprinkles. I didn't really like the gaps left between the
cubes. In Ruby's design, she added beaded loops, however I didn't
think this would look right on a bracelet, so I added the slightly
bigger version of the Sugar Sprinkles seeds, called Sugared Almonds. I couldn't make this up if I tried - I swear I don't do it on purpose!
It's a basic Daisy stitch, with seed beads lining the cubes. The ones I used are a mix I got from Jilly Beads
called Sugar Sprinkles. I didn't really like the gaps left between the
cubes. In Ruby's design, she added beaded loops, however I didn't
think this would look right on a bracelet, so I added the slightly
bigger version of the Sugar Sprinkles seeds, called Sugared Almonds. I couldn't make this up if I tried - I swear I don't do it on purpose!
 I made a toggle clasp from the seeds, so it's another metal-free bracelet. However, I'm not sure if the electroplating on the seed beads counts - so it might not be completely metal-free.
 =:x
=:x


Subscribe to:
Posts (Atom)